


Quick Links
Popular Searches
Close
Products

(This product is only available for South Region)
Looking for enterprise solutions?
Discover SeqriteLooking for enterprise solutions?
Discover SeqriteLooking for enterprise solutions?
Discover SeqriteLooking for enterprise solutions?
Discover SeqriteLooking for enterprise solutions?
Discover SeqriteLooking for enterprise solutions?
Discover SeqriteSupport
Resources
Downloads
Company
MONDAY - SATURDAY
9.00 PM to 12.00 PM (EST)
+1-3473382630 (Toll Free Number)
Regional language support provided in below selected languages only, as per availability of native speaking support executive : Hindi, English, Marathi, Bangla, Tamil, Telugu, Malayalam & Kannada.
Time is money. Don’t waste it


You can register/activate Quick Heal antivirus online, offline, and through SMS as per your convenience.
Registering online
If you are connected to the Internet, you can register your product online.
1. Open Quick Heal antivirus.
2. On the Quick Heal Dashboard, click the Register Now button.
3.On the Registration Wizard, enter the 20-digit Product Key and click Next.
The Registration Information appears.
4.Enter relevant information in the Purchased From and Register for text boxes, and then click Next.
5.Provide your Name, Email Address, and Contact Number. Select your Country, State, and City.
If your State/Province and City are not available in the list, you can type your locations in the respective boxes.
6.Click Next to continue.
A confirmation screen appears with the details you entered.
If any modifications are needed, click Back to go to the previous screen and make the required changes.
7.Click Next to continue.
Your product is activated successfully. The expiry date of your license is displayed.
8.Click Finish to close the Registration Wizard.
After the registration process completes, you are prompted to create an account with Quick Heal RDM that allows you to manage your device remotely. To know about how to create an account with Quick Heal RDM, see Remotely Manage Quick Heal in the user manual.
Registering offline
You can register Quick Heal antivirus offline if your computer is not connected to the Internet. Before registering offline, make sure you have product key, installation number, and activation license key ready with you.
You may contact our technical support team
To retrieve your lost product key, visit Lost page and fill the required information. Alternatively, you may write to support@quickheal.com with the purchase details. We will respond as soon as possible.
To retrieve your lost Product key, visit the page: Lost and provide your necessary information.
Alternatively, write to us at support@quickheal.com, providing your purchase details, and we will respond to your request promptly.
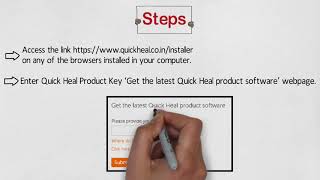
You can download and install Quick Heal antivirus using either the Quick Heal installer or a Quick Heal CD.
To download and install the latest Quick Heal antivirus using the Quick Heal Installer, please follow these steps:
Using the Quick Heal CD
Yes, Quick Heal Antivirus is designed to support visually impaired users. To enable screen reader functionality, you will need to download the third-party tool, NVDA version 2024.4.2 .
The NVDA screen reader is available for free to all users.
The features of AntiFraud.AI cater to address the frauds happening on that platform ecosystem. The features are also subject to restriction imposed by the respective operating system that may be limiting. Despite these constraints, AntiFraud.AI continues to offer core functionalities across all three platforms Android, iOS and Windows.
No, the desktop AntiFraud.AI does not include an antivirus engine, hence it does not need daily updates. To ensure you avail all the latest benefits of the app, your desktop AntiFraud.AI application would be upgraded periodically as frauds are dynamic in nature.
With the Fraud Protect Buddy feature, you can designate your loved one—such as an elderly parent or a child—who may be at risk of fraud, as a ‘Dependent’ after purchasing a license for them. This feature will promptly notify you if they receive a call that has the potential to be fraudulent, helping you to take timely action and prevent payment fraud.
Both you and your buddy need to have an active subscription of AntiFraud.AI.
AntiFraud.AI is India’s first fraud prevention solution designed to keep users safe from frauds and scams. Leveraging advanced AI and machine learning (M/L) technology, it focuses on detecting potential fraudulent situations and alerting users in real-time. Given the dynamic nature of fraud, where methods constantly evolve, an active subscription to AntiFraud.AI ensures access to the latest features as they are added, continually adapting to the newest fraud tactics. This proactive approach empowers users to stay one step ahead of potential threats.
Please follow these instructions to activate your product:
• For Android devices:
Step 1: Download the App from Google Play Store
Step 2: Verify your details and follow the instructions
Step 3: Select 'Enter Subscription Key' and enter the product key
• For iOS devices:
Step 1: Click here to fill up the form
Step 2: Verify your details and follow the instructions
Step 3: Download the app from App Store and follow the instructions in app
• For Windows devices:
Step 1: Visit Download Installer page.
Step 2: Enter the product key
Step 3: Follow the instructions on screen
If you have any questions or need further assistance, please visit here
The Dashboard of AntiFraud.AI is Super intuitive in nature and has an inbuilt help available. However, for any further support, you may reach out to below:
A mobile phone virus is a malicious piece of code or program, designed to target mobile devices. It may damage and steal data on your device.
These are few of the malicious programs that affect mobile devices:
To use Quick Heal Mobile Security, your mobile phone should have Android version 6.0 or later
Yes, you can but it is not advisable to run multiple antivirus software programs on a single computer as it slows down your system performance.
Click any feature within Quick Heal, and you will be prompted to enter your password.
On the same dialog box, you will find a Forgot password? link. Click this link to initiate the password retrieval process.
You can also reach out to our technical support team through the Quick Heal Support Portal.
To retrieve your lost Product key, visit the page: Lost and provide your necessary information.
Alternatively, write to us at support@quickheal.com, providing your purchase details, and we will respond to your request promptly.
To update your contact details, access the product console by opening the Quick Heal app. Navigate to More > License Details and click the pencil icon to make the necessary changes. Alternatively, you can also send an email to support@quickheal.com, with your current details along with your purchase details. Quick Heal will promptly address your request and assist with the necessary changes.
You may contact our technical support team at https://www.quickheal.co.in/support.
You can purchase Quick Heal in the following ways:
New viruses and malware are constantly being created. To defend against them, security updates are released, and it's essential to keep your security software up to date to stay protected.
You can setup your device to automatically get updates whenever they're released. In automatic mode, these updates happen in the background without you having to do anything.
No, AntiFraud.AI does not come free with Quick Heal Antivirus.
However, fraud prevention features for Windows are now inbuilt part of Quick Heal Total Security (TS) from version 25. Existing customers of Quick Heal Total Security on older versions are eligible for a free upgrade.
Yes, you still need Antivirus for desktop to protect yourself from malware and you also need AntiFraud.AI to remain one step ahead of fraudsters.
Digital fraud typically involves deception and manipulation, whereas antivirus software is specifically designed to detect, prevent and remove malicious software such as viruses, worms, trojans, ransomware and spyware from devices.
Yes, Quick Heal Antivirus is designed to support visually impaired users. To enable screen reader functionality, you will need to download the third-party tool, NVDA version 2024.4.2 .
The NVDA screen reader is available for free to all users.
It depends on the type of license you have. A Single User license (for products like TS, IS, ISE, AV Pro) is meant for one user on one device at a time and should not be shared.
Removing Quick Heal antivirus may expose your computer to virus threats. However, if you need to uninstall it, follow these steps:
For more info, check Uninstalling Quick Heal Antivirus.
You can download and install Quick Heal antivirus using either the Quick Heal installer or a Quick Heal CD.
To download and install the latest Quick Heal antivirus using the Quick Heal Installer, please follow these steps:
Using the Quick Heal CD
Quick Heal antivirus is compatible with Windows 11, Windows 10, Windows 8.1 and Windows 8, Windows 7.
Yes. To install Quick Heal antivirus on another computer, uninstall it from the current device, then install it on the new device. Remember, each Quick Heal Product Key is intended for use on a single system at a time.
You can find the Product Key in the following ways:
OR
The Installation Number can be obtained during the offline registration process. Refer Registering Quick Heal offline for more information.
Quick Heal automatically detects whether your computer operating system is 32-bit or 64-bit and download the correct installer version on your device.
To know operating system and the version of your computer:
On Windows 11 and Windows 10
On Windows 8.1 and Windows 8
Yes. Antivirus software is designed to detect, prevent and remove malicious software (malware) from devices. This includes viruses, worms, trojans, ransomware, spyware etc.
The nature of Digital Fraud is different, which is often more about deception and manipulation. That is why Antivirus software might not be sufficient for protecting against various types of digital fraud.
Fraud prevention capabilities for the windows platform are now inbuilt as a part of our flagship product Quick Heal Total Security from version 25, existing customers of Quick Heal Total Security on older versions are eligible for a free upgrade.
For any other variant of Quick Heal Antivirus or any other Brand of Antivirus software, you will have to purchase AntiFraud.AI subscription separately.
You can register/activate Quick Heal antivirus through the following methods:
If due to any reason you need to reinstall your operating system or Quick Heal, it is necessary to reactivate your copy after reinstallation.
Reactivation of Quick Heal can be done through following process:
Reactivating On-line with Internet Connection on same PC
Reactivating Off-line using Internet Connection on some other PC
Your 20 Digit alphanumeric Product key/Serial Number of Quick Heal is your Customer ID or Customer Reference Number. Please do mention your Serial Number in every communication with Quick Heal Team.
You can retrieve your lost serial/activation number by visiting https://www.quickheal.co.in/lost
You can use your registered copy until the subscription period of your Quick Heal copy expires. After the subscription period is over, you will be required to renew your Quick Heal subscription.
For registered users, all updates and upgrades are free of cost till the license is active.
If you have purchased Quick Heal through a boxed copy, the Product Key (Serial Number) will be available within the packaging.
For online purchases, the Product Key is provided in the order confirmation email.
To retrieve the Product Key from your computer, follow these steps:
If registration wizard is not accepting the serial number, try the following:
To activate Quick Heal Product key without internet connection, visit the links:
Offline Registration: Registering Quick Heal antivirus Offline
SMS Registration: Registering Quick Heal antivirus through SMS
Yes, you can register Quick Heal antivirus offline. Before registering Quick Heal antivirus offline, ensure to keep the product key, installation number, and activation license key ready with you.
For more information, check Registering Quick Heal Offline.
Yes, it is possible to register Quick Heal via SMS, but please note that this registration method is available exclusively to subscribers based in India.
For more information, see Registering Quick Heal through SMS.
You can renew Quick Heal through the application.
To renew, you need either renew your existing product key or can to get a new renewal Product Key as well
For more details reach out to renew@quickheal.co.in or call us at 09272202525
If you renew your license online, the license details will get updated automatically.
To update your license details manually:
Your details will be updated.
If you are using an older version of Quick Heal antivirus, we recommend that you first upgrade it to the latest version and then renew your license.
To upgrade to the latest version,
Download and install the latest product build from Quick Heal Installer.
You also can get in touch with our Support Team at our Toll Free number: 1800-121-7377.
You can drop us an email at renew@quickheal.co.in, with your banking transaction details. Quick Heal will get back to you with an update.
Contact our renewal helpline on +91-92722 02525.
Available Timings: Monday to Friday - 09.00 AM to 07.00 PM (IST)
Saturday & Sunday - 09.30 AM to 06.30 PM (IST).
After we confirm the payment, your license is renewed within 30-60 mins.
Yes. The validity of your renewed license begins after the original expiry date.
For example, if your license expires on 20th July 2023 and you renew it on 1st July 2023 for a year. Your new license validity will start from 20th July 2023. Hence, you do not lose the period between 1st and 20th July.
No. Only your existing version of Quick Heal antivirus will be renewed and not upgraded.
To upgrade your product to the latest version, Download and install the latest product build
No. Reactivation is reinstalling your Quick Heal antivirus after uninstalling it from your computer and registering your details again.
Renewal means extending the current license validity post expiry of license by purchasing a new renewal code.
Yes. Ransomware Protection feature of Quick Heal protects you from all ransomware attacks. It also backs up your data and will help you restore it in case there is any such attack. It is recommended that you always keep Ransomware Protection turned on.
You are advised to always keep Ransomware Protection on. This feature regularly backs up your data including the Tally files. In case of a ransomware attack, you can easily recover all your backed up data.
Don’t worry, Smart Parenting feature helps you configure rules so that you can block any website and videos that you feel are inappropriate for your children. Go to Internet Browsing Manager section under Smart Parenting to make such rules.
For more details visit: https://www.quickheal.com/smart-parenting
Smart Parenting feature enables you to either block any game application or allow set block of time to play games post which the game websites/apps get automatically blocked.
For more details visit: https://www.quickheal.com/smart-parenting
To protect your privacy, follow below steps:
This feature prevents malwares from accessing your device webcam and capture your photos without consent to blackmail you.
Also, there are more features under Privacy tab to help you configure policies to protect your privacy.
If you have turned on Virus Protection under Protection > Device Security > Virus Protection, Quick Heal antivirus will automatically clean any virus that is found in a file or document. By default, Virus Protection is turned on when you install Quick Heal.
If an upgrade is available for your Quick Heal product, a button Upgrade Now will be displayed on your dashboard. For more information, see Upgrading Quick Heal.
See Also : https://www.quickheal.co.in/upgrade
You may get an error as Invalid License if the same product key is activated/used on more than one system at a time. To resolve the issue, confirm in your network/premises if one product key is activated in one system only. If you find the same product key is activated on two systems, then uninstall Quick Heal & use the product key on any one system only.
If issue persists, contact our technical support team at https://www.quickheal.co.in/support
This may be because of version incompatibility issue. You might have downloaded a product version that is not compatible with the operating system of your device. For example, you may have downloaded a 32-bit version whereas the operating system on your device is 64-bit.
For further details, please see How can I identify whether my operating system is 32-bit or 64-bit?
It is because the offline activation license key is unique and for one time use only. You need to create this key once again with new installation number to register your device offline.
To know about how to generate the offline activation license key, see Registering offline.
It may be due to technical incompatibility between the features and operating system of your device. Please check the feature specific compatibility table by clicking here.
You can configure Quick Heal to obtain updates from a computer in your network that is connected to the Internet. For more information, see App Updates.
Browsing Protection protects you from accessing websites with malicious content. It ensures that malicious websites are automatically blocked, and you have a safe browsing experience.
Autorun Protection secures your device against malwares that autorun themseleves by blocking the Autorun feature of your device. To configure Autorun Protection go to Protection > External Drive Protection > Autorun Protection on the product.
The Self Protection feature ensures that important Quick Heal files, folders, configurations and registry entries cannot be altered or modified by any viruses or malwares, or tampered by other applications.
The conventional delete in Windows will retain a copy of the file in Recycle Bin. If you Shift+Delete a file, it is removed from the system. But the file can be retrieved by using a recovery software. The Secure Delete feature in Quick Heal Antivirus permanently erases the file from the hard disk making it impossible to retrieve the file using recovery software as well.
Anti-Tracker blocks trackers that track your activities online. Trackers on websites collect data about the types of websites you visit, what videos you view, and what social networking sites you use etc. Trackers use this data to show you personalised advertisements.
Wi-Fi Scanner scans the Wi-Fi router that your computer connects to and helps you know if the router has vulnerabilities, and weak links that can get you in trouble.
Game Booster allows you to enjoy playing games on device faster and smoothly with no frame drops or lags.
SIA is your AI-powered security assistant on your desktop. It answers your security-related questions in real-time. Just make sure your device is connected to the internet for it to work.
It’s a service that checks if your personal info (like email, phone number, or password etc.) is found on the dark web. If there’s a match, you will be informed.
It speeds up your PC by cleaning out junk files, unused cache, and temporary files that slow things down.
metaProtect is a centralized security dashboard where you can manage all your desktop and mobile security settings, all from one place.
Admin Console protects your organization's computers from Viruses, Trojans, Worms, Backdoors, Hackers, other malwares e.g. Spywares, Riskwares and Pornwares etc. It is Web Based Management Console which provides following features:
Agent Server is a service running on Admin Consol Server system. It pushes Client Settings, Scan Now and Update Now requests to all the clients initiated by the Administrator. And it also helps to provide latest information of all clients and keeps comprehensive logs about virus incidents, policies and updates at central location.
Client Agent is a service running on every Admin Console Client system. It communicates with the Agent Server and performs various tasks initiated from the Admin Server by your Administrator. E.g. – Scan Now, Update Now etc. It also sends Virus Logs to the Admin Server when an infection is found and Status Information if it is changed.
Quick Heal Admin Console encompasses two main modules
At first, check the System on which Admin Console Server is installed is getting 'ping' from remote system. Give the ping command as follows:
(If Admin Console site has been configured on IP Address)
ping < IP address of Admin Server>
E.g. ping 192.168.100.34
(If Admin Console site has been configured on Domain Name)
ping < domain name of Admin Server >
E.g. ping quickheal.admin.com
As in case of Domain based network, if the Admin Console Site is configured on Domain Name and DNS is not properly configured then remote system will not be able to ping the Admin Server system. To solve this problem, Administrator needs to configure proper DNS settings on the remote system.
We recommend you to configure Admin Site on the IP Address rather to configure it on the domain name.
Secondly, check Installer logs by going in Client Reports and clicking on View Installer logs . This will also give you clear information about why Quick Heal is not getting installed on the remote system.
If any Firewall is running then check if the URL or Port through which the build is getting downloaded is blocked.
Make sufficient disk space on the Remote System to download and install AntiVirus if installer log shows installation failed due to insufficient disk space.
Verify if the Agent Server Service is started on Admin Console Server.
If Internet Connection is configured using Proxy Server, it may not be able to resolve the name or IP of the Admin Console Server. In this case bypass the Proxy Settings for the Admin Console Site.
Subnet Mask of the Remote System should be as per the IP class assigned to the Admin Console Server system.
Quick Heal Client can be deployed using various different methods as listed below:
Update Manager is a centrally deployed tool that can be configured to download all the updates from our dedicated update server. It constantly monitors for new updates of Quick Heal and automatically downloads them as and when there is a new update available. It pushes the latest downloaded updates to all the clients automatically.
Please go through the instructions to upgrade existing Quick Heal Admin Console
This problem occurs when Client Agent is not able to connect to Agent Server OR Agent Server is not able to connect to Client Agent
First check, if both the systems i.e. Admin Console Server and Remote System are able to communicate with each other on the configured port. To check this follow the below given steps
Verify if the Agent Server Service is started on Admin Console Server.
Verify if the Client Agent Service is started on Remote System.
Telnet < IP Address of Admin Console Server > < Agent Server Port >
Suppose IP address of Admin Server is 192.168.100.34 and 5036 is the port on which Agent Server is listening. Then execute the following command on remote system.
E.g. Telnet 192.168.100.34 5036
If you receive any response from Agent Server, then check whether Agent Server is able to communicate with Client Agent.
Telnet < IP address of Remote System > < Client Agent Port >
Suppose IP address of the remote system is 192.168.100.66 and 62107 is the port on which Client Agent is listening. Then execute the following command on Admin Server.
E.g. Telnet 192.168.100.66 62107
Please check if any Firewall service is installed on the system, If YES then that firewall can block the communication between Agent Server and Client Agent.
When proxy setting has been configured in Internet Explorer then it tries to resolve the Admin Console Site via Proxy Server and if Proxy Server is not able to resolve it then site does not get open.
In such case, check Proxy Server configuration of remote system. Proxy Server should be able to resolve the IP address or domain name on which Admin Console Site is configured. Or follow the below given steps to bypass Proxy Server while opening Admin Console Site:
This problem mostly caused if the Web Server Service is not running.
If Admin Console Server is configured using IIS Server then check the IIS Admin Service is running. And also check whether Admin Console Web Site is running in IIS.
If Admin Console Server is configured using Apache HTTP Server then check the Apache Service is running.
Secondly, there can be a UTM (Unified Threat Management) device in the network, which may block the port. If it is, then open the port of the Admin Console Server.
The Anti-theft feature protects your device from dangers of theft. It helps you manage your device remotely using metaProtect in case your mobile gets lost or stolen. You can click pictures, videos, record audio from your missing device using Anti-Theft. Further, it also helps you block your phone remotely, wipe its data, and trace the device's location.
Yes, you can remotely block your mobile device if it was previously added on metaProtect.
You can call our Support Team on 1800-121-7377.
Yes, you can unblock your mobile. Simply enter the PIN on lock screen to unlock device.
Or
Click UNLOCK from metaProtect for that device or call our Support Team at 1800-121-7377.
If you have forgotten your PIN, you can reset it.
The captured photo, audio and video are sent to your registered email address that you have configured with your metaProtect account.
Yes, you can see the license details of all your devices under the License tab.
No, you have to renew the product license to manage the device.
Yes, if you own multiple mobile devices and want to ensure that adequate security settings are applied on all of them, you can use the Quick Heal metaProtect portal.
Quick Heal metaProtect allows you to control and manage multiple devices remotely with a single account.
To avail this facility:
If you install Quick Heal on another Mac computer, it is necessary to register your software after you install Quick Heal. You must perform the Registration procedure by providing new Product Key. Any previously obtained Product Key is invalid and will not work on another machine.
One Product Key can only be used for one computer.
macOS High Sierra 10.13 introduces a new feature that requires user approval before loading newly-installed third-party kernel extensions (KEXTs). When a request is made to load a KEXT that the user has not yet approved, the load request is denied
NOTE: If you do not Allow to load Kernel Extensions, Quick Heal Total Security will not be able to secure your computer against viruses, malicious websites, spam emails, and suspicious programs. Your computer will be at risk.

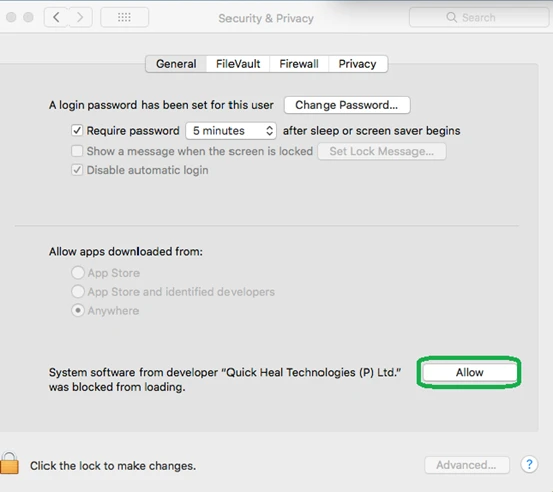
If you already have Quick Heal Total Security for MAC installed on your Mac System, Total Security will continue to work well after you upgrade to macOS 10.13 High Sierra.
After installation of Quick Heal, you will need to register your copy to activate it. You should Register and Activate your copy immediately after installation, as without Activation Quick Heal cannot be updated. Registered users can get other benefits like technical support, Parental Control, etc.
You can easily register your Quick Heal online with the help of the steps mentioned below:
Note:
Serial Number (product key) can be found in the User Guide or inside the product box. It can also be found in the email confirming your order.
If due to any reason you need to reinstall your operating system or Quick Heal, it is necessary to reactivate your copy after reinstallation. You can easily reactivate your Quick Heal online. Click here to know how.
A Serial Number serve as a user’s Identity. In case you lose your Serial Number, you can obtain it by contacting Quick Heal Technical Support at a nominal charge.
You can use a registered copy until the expiry date of its subscription period. After the subscription period is over, you will need to renew the subscription to ensure your computer stays protected against new and emerging threats.
Registration wizard does not accept invalid product keys. To avoid such messages, please enter a valid product key as provided to you in the registration wizard.
In case the above problem persists even after following the above step, please contact Quick Heal Technical Support.
You can Remove your device from the RDM portal or contact Quick Heal Technical Support for assistance.
No, you must Remove it manually. You can do it from the RDM portal or by contacting Quick Heal Technical Support for assistance.
Yes, you can register your license offline using the 'Register offline' button from products "Dashboard"
Once the subscription of your copy of Quick Heal expires, you need to renew it to continue receiving updates against the latest viruses. During renewal, you can renew your copy of Quick Heal for 1 year or 3 years.
The first benefit of renewing your Quick Heal copy is the continuous updates received during the renewed subscription period. These updates provide uninterrupted protection to your system and its data against the latest viruses and other threats.
Renewal is also a cost-effective solution when compared to purchasing a new product. The renewal code costs lesser than purchasing the new product and still provides uninterrupted protection against the latest and unknown threats and free upgrade to new version.
If you renew your copy of Quick Heal before subscription expiry, you will receive a bonus of two months' additional protection during renewal of subscription.
If you have purchased the box copy of Quick Heal, the Product Key (or Serial Number) will be pasted on the User Guide or inside the box. If you have purchased the software online, you will find the Product Key in the email confirming the order.
If you purchase a renewal code with validity for 1 Year or 3 Years and renew your copy of Quick Heal before subscription expiry, you will get subscription validity of 1 Year + 2 Months or 3 Years + 2 Months from the date of subscription expiry. If you renew your copy of Quick Heal after subscription expiry, then you will get 1 Year or 3 Year validity from the date of renewal.
Example 1
Mr. John has a copy of Quick Heal Total Security for Mac that expires on April 10, 2013. He purchases a renewal code on March 10, 2013 and renews his copy. His new subscription validity is June 10, 2014 (1 Year + 2 Months).
Example 2
Mr. Jack has a copy of Quick Heal Total Security for Mac that expires on April 10, 2013. He purchases a renewal code on May 10, 2013 and renews his copy. His new subscription validity is May 10, 2014 (1 Year).
No, a CD is not provided for renewal. The purchased renewal code will extend the subscription of your copy of Quick Heal. If you want to upgrade to the latest Quick Heal product during your subscription validity, you can do it free of cost by downloading the Product Upgrade from the Upgrade page.
As per Quick Heal Renewal Policy, if your copy of Quick Heal has expired then you can renew it within six months from the date of expiry.
If you need to uninstall your copy of Quick Heal from your machine and re-install it later, you must reactivate the software upon installation. This is called Reactivation. Extending the subscription validity of your copy of Quick Heal by purchasing a renewal code is called Renewal.
During renewal of your copy of Quick Heal, if you purchase an additional copy of Quick Heal, you will receive a discount on the purchase of the additional copy. To know more, contact your nearest Quick Heal branch or distributor for the same. For a list of Quick Heal branches and distributors across the globe, please visit our Locate Dealer page.
You can contact Quick Heal Support Center. You can also contact your nearest Quick Heal branch or distributor. For a list of Quick Heal branches and distributors across the globe, please visit our Locate Dealer page.
After purchasing the renewal code from the distributor, you need to renew the copy of Quick Heal by performing the following steps:
The license of Quick Heal Total Security is renewed successfully. Click Finish.
Note:
You can schedule the scanner to run automatically at predetermined time and intervals. You can schedule the scanning for daily and weekly. This will supplement other automatic protection features to ensure that your machine remains virus-free.
To configure Schedule Scans, follow these steps:
To configure Proxy Setting, follow these steps:
NOTE : Pre-Quick Heal Windows-Desktop-Activation condition: Your Quick Heal desktop for Mac should be activated first.
The following steps showcase how Quick Heal can be installed on a parallel desktop:
No. If two machines are activated with the same key, the other activated copy will be tagged as "Pirated".
Quick Heal Total Security for Mac, Total Security, Internet Security and AntiVirus Pro has a feature called Browsing Protection. It runs Internet browsers in a virtual environment. Any malicious file downloaded in this environment is isolated from the real PC thus preventing such files from causing a malware infection.
Please contact Quick Heal Technical Support at support@quickheal.com.Click here to view Quick Heal Technical Support details.
Browsing Protection automatically blocks access to websites that are loaded with malware codes and are designed to infected visitors’ machines.
Phishing Protection is a part of Web Security that blocks access to fake and phishing websites designed to steal personal and financial information from users.
With Password Protection, you can restrict all other users from accessing Quick Heal Total Security so that no unauthorized users can make any changes in the settings.
To configure Password Protection, follow these steps:
Parental Control can be used to control the Internet activity of the children or other users. Parents can decide which websites their children should visit and which they should not. Using the Parental Control feature, the parents can restrict categories of websites or block specific websites. The parents can also schedule Internet accessibility for their children.
With Spam Protection, you can block all unwanted emails such as spam, phishing and porn emails, from reaching into your mailbox. Spam Protection is enabled by default and we recommend you always keep the feature enabled.
Open Quick Heal Total Security and then go to Menu > Quick Heal Total Security > About Quick Heal Total Security. On the About screen, click the View Details button.
To get support regarding any technical issues, follow these steps. On the Quick Heal Total Security menu bar, go to Help > Support. Here you can find various means for support.
To access the Help option, follow these steps.
On the Quick Heal Total Security menu bar, go to Help > Quick Heal Total Security Help.
Scan My Mac is a complete scanning of your system. With Scan My Mac, you can scan the entire machine, files and folders excluding mapped network drives, folders, and files.
This feature prevents Quick Heal product files from getting altered or modified by viruses and malware or tampered by other applications.
RDM is a free portal where you can manage Quick Heal Total Security on your device.
To use RDM feature on the trial build you need to REGISTER the product first by following the below steps:
To create an account Click on ‘Sign up’ button.
Enter Username, Mobile number, Product Key, Language preference, Verification code, check License agreement check box and Click Sign up button.
An email to activate the account will be sent to the registered email id.
In the email, click the ‘Activate’ button or run the given link in the browser. You will get Set Password screen to set the password for created account.
Once password is saved you can Sign in to your new created account and Add device.
Yes, you can change your account information such as your name, email address, mobile number, and password on the My Account page.
To navigate to the My Account page
Yes, you can add up to ten (10) devices (smartphones/computers/laptops) in a single Quick Heal Remote Device Management account.
No.
No, but you can simply remove the device added in one Quick Heal Remote Device Management account and then you can add the same device to a different Quick Heal Remote Device Management account
To remove your device having Quick Heal product, follow these steps:
To remove your device having other Quick Heal products, follow these steps:
It is recommended to authorize the device immediately. However, the OTP generated can be used to validate the mobile device within 10 minutes and computer/laptop within 48 hours.
Yes, you can generate the OTP again by clicking the 'EXPIRED (Resend OTP)' link (On the Quick Heal Remote Device Management Dashboard, click the Add Device tab and then click the 'EXPIRED (Resend OTP)' link).
Yes, you can remove a device for which you have not validated the OTP yet.
No, it will be added to the pending device list and you can generate OTP to add it in Quick Heal Remote Device Management account.
Yes, you can change any device as default. However, it is good to set such a device as default that you consider critical and you want to monitor it closely.
No, you do not have to add the device again. Instead you will be asked to reauthorize the previously added device.
If you enter wrong login credentials three times, your Quick Heal Remote Device Management account will get locked.
To unlock your account, click the ‘Unlock Account’ button on the login page. An email with unlock link is sent to your registered email ID. In the email, click the ‘Unlock Account’ button or copy the given link in the browser. Your account will be unlocked.
No, to communicate to a device through Quick Heal Remote Device Management portal, your device must necessarily be connected to the Internet.
Yes, the device will remain added and can be viewed on the Quick Heal Remote Device Management portal, but the status of the device will not be updated and if the device is not connected to the Internet for 3 or more days, the status will be "System is Offline".
Connect the device to the Internet. Your Quick Heal will automatically update the status to the Quick Heal Remote Device Management portal.
Enter username in login page. Click on the Forgot Password link.
An email to reset password will be sent to your registered email id.
In the email, click the ‘Reset Password’ button or copy the given link in the browser. You will get a window to reset your password.
Yes, you just need to toggle the 'Remotely Manage Quick Heal' button (Settings > Remotely Manage Quick Heal.)
Yes, you can see the license details of all your devices from the License Summary page.
Yes, you can renew your license from Quick Heal Remote Device Management portal using the 'Renew Now' link from dashboard.
No, the settings of Quick Heal cannot be changed from the Quick Heal Remote Device Management account.
Yes, you can see the Device Details with below steps:
No. Running more than one antivirus software on a single computer is not recommended.
Click on any feature, you will be prompted to enter your password. On the same dialog box, you can see a link Forgot password? Using this link, you can retrieve your password.
You may also contact our technical support team through the Quick Heal Support Portal.
To retrieve your lost product key, visit www.quickheal.co.in/lost and fill the required information. Alternatively, you may write to support@quickheal.com with the purchase details. We will respond as soon as possible.
To update your contact details, access the product console by opening the Quick Heal app. Navigate to More > License Details and click the pencil icon to make the necessary changes.
Alternatively, you can also send an email to support@quickheal.com, with your current details along with your purchase details. Quick Heal will promptly address your request and assist with the necessary changes.
You may contact our technical support team.
Total Security Multi-Device can be used on multiple devices at the same time, based on your chosen pack (such as 3-device or 5-device). It works across Windows, Mac, and Android using the same product key.
If you reach your device limit, you can still transfer it by deactivating it on one device before activating it on another.
Double click on Quick Heal installer to proceed with installation and follow on-screen instructions.
If you install Quick Heal on another computer, it is necessary to register your software after you install the software. You must perform the Registration procedure by providing a valid Serial Number (product key).
If due to any reason you wish to uninstall Quick Heal, follow the below given steps:
Note:
In this case you need to uninstall Quick Heal from old system and install it on upgraded system. You also need to reactivate Quick Heal after installation.
Different operating systems may be available in different versions, 32-bit or 64-bit. If you download Quick Heal antivirus from our website on the computer where you want to install it, our installer will automatically detect your computer operating system and its version. Hence, you will get the right product. However, in case you need to know operating system and the version of your computer, follow these steps.
If the System type is 32-bit operating system, you need to download 32-bit Quick Heal antivirus product setup file. If the System type is 64-bit operating system, you need to download 64-bit Quick Heal antivirus product setup file.
If the System type is 32-bit operating system, you need to download 32-bit Quick Heal antivirus product setup file. If the System type is 64-bit operating system, you need to download 64-bit Quick Heal antivirus product setup file.
Microsoft Windows Server 2012 R2, Windows Server 2012, and Windows Server 2008 R2 operating systems are available only in 64-bit.
If the System type is 32-bit operating system, you need to download 32-bit Quick Heal antivirus product setup file. If the System type is 64-bit operating system, you need to download 64-bit Quick Heal antivirus product setup file.
After installation of Quick Heal you will need to register your copy to activate it. You should Register and Activate your copy immediately after installation, as without this Quick Heal cannot be updated. Registered users can get other benefits like technical support and messenger service.
You can easily register your Quick Heal online. Click here to know how.
Note:
See Also
Your Serial Number of Quick Heal is your Customer ID or Customer Reference Number. Please do mention your Serial Number in every communication with Quick Heal Team.
A Serial Number serve as a user’s Identity. In case you lose your Serial Number, you can obtain it by contacting Quick Heal Technical Support at a nominal charge.
You can use registered copy till the subscription period of your Quick Heal copy. After the subscription period is over you will need to renew the subscription for your copy of Quick Heal.
All updates are free for registered users until the subscription period is over.
Here, you will find the product key, product version, virus database and subscription validity information.
Registration wizard does not accept invalid serial number. To avoid such messages please type serial number as it as provided to you in the registration wizard.
This problem may arise if you are using a ‘proxy server’ or ‘Socks Version 4 & 5’ on your network. In this case, you have to configure the ‘Internet Settings’ of the registration wizard. Click here to know how.
This problem may also arise if you or your ISP is using Firewall. Firewall should be configured to allow Registration Wizard to get Internet access.
If this problem persists even after following the above steps, then please contact Quick Heal Technical Support.
If you are "using a proxy server" or "using Socks Version 4 & 5" on your network. You need to configure "Internet Settings" of Registration Wizard to get Internet access.
Please follow the below given steps to configure Internet Settings:
You need to deactivate Quick Heal license from one of your activated devices. You can deactivate your device from the RDM portal or contact Quick Heal Technical Support for assistance.
You can deactivate your device from the RDM portal or contact Quick Heal Technical Support for assistance.
No, you must deactivate it manually. You can do it from the RDM portal or by contacting Quick Heal Technical Support for assistance.
This is applicable to Quick Heal Total Security Multi-Device. You can activate it using a single product key on your Windows, Mac, or Android device.
No, you can activate Quick Heal only through online registration on the required PC using Internet access.
Once your Quick Heal subscription expires, you must renew it to continue receiving security updates against new and latest viruses. During renewal, you can renew your subscription for 1 year or 3 years.
Renewing your Quick Heal ensures that your computer keeps receiving continuous security updates that are necessary to prevent malware attacks and online threats. Renewing is also cost-effective because it is cheaper than purchasing a new product.
Please call us on 09272202525 or drop us an email at renew@quickheal.co.in for current offers and discounts.
To renew your copy of Quick Heal, you can purchase the renewal code from our online store or send us an email at renew@quickheal.co.in. Alternatively, you can also visit your nearest Quick Heal office. For a list of Quick Heal branches and distributors across the globe, please visit our Locate Dealer page here.
If you have purchased the box copy of Quick Heal then the Product Key (or Serial Number) will be available in the user guide or inside the box. If you have purchased the software online, then you will find the Product Key in the email confirming the order.
You can also obtain the Product Key from your system with the help of the following steps:
According to Quick Heal Renewal Policy guidelines, if your copy of Quick Heal has expired then you should renew it within six months from the date of expiry.
If you uninstall your Quick Heal product and reinstall it, then you have to reactivate the software after the installation. This is known as Reactivation. For reactivation, click this link - http://www.quickheal.co.in/installer
Extending the subscription validity of your Quick Heal license by purchasing a renewal code is known as Renewal.
You can always get in touch with our Renewal Team at 09272202525. Alternatively, you can also contact your nearest Quick Heal branch or distributor.
After purchasing the renewal code, please follow the steps mentioned below (ensure that your system is connected to the Internet during the entire procedure):
After renewing your copy of Quick Heal from the website, please follow the steps mentioned below to complete the renewal process (ensure that your system is connected to the Internet during the entire procedure):
Once you have made the payment through any payment gateway, your copy of Quick Heal will get automatically renewed. Kindly follow the steps given below:
You can securely pay for your online purchase on our website via net banking, or using your debit/credit card.
During renewal, the customer’s existing product key will be renewed.
Renewing an expired product license means that its validity will last from the renewal date till its new expiry date*. For instance, your product license (1 year) expired on 1st January 2015. You renew it for 1 year on 20th January 2015. So, the new expiry date of your license key will be 20th January 2016.
*Terms & Conditions will apply as per offer(s) running at that point of time.
If you have made a payment online but not sure of the transaction, you can drop us an email at renew@quickheal.co.in. We will cross-check the same with our accounts department and get back to you with an update. Alternatively, you get in touch with our renewal helpline on 020 6683 5911 between 9.30 AM to 6.30 PM, Monday to Friday.
No, we only offer renewal for 1 year and 3 years.
Once the payment is reflected in our system, the license gets renewed on the same day.
Yes, you can securely pay for your online purchase on our website with your debit/credit card.
Yes, the validity of your renewed license will begin from the original expiry date itself so that you don’t lose the remaining period. For instance, your license expires on 20th July 2015. You renew it on 1st July 2015 for a year. So, your new license validity will start from 20th July 2015 and not from 1st July 2015; you do not lose the period between 1st and 20th July.
To retrieve your lost product key, please write to us at support@quickheal.co.in with your registered email address & name. Alternatively, you can also visit www.quickheal.co.in/lost
In the app (CRW), users can renew their license within 90 days following the expiration date. After this 90-day period, a prompt will appear advising users to purchase a new license.
Yes, you can carry forward the same license key with its existing validity on your new system. For this, you have to uninstall your Quick Heal copy from your old system, and install it on the new system and activate the copy using the same product key.
Yes, you can send the same on the below address:
Quick Heal Technologies Pvt. Ltd.
Office No. 9, MHADA Complex, S. No. 120
Phule Nagar, Near RTO Office
Yerwada, Pune-06
Maharashtra
Yes, even if you purchase a renewal code from a dealer, you will be eligible for any offer running at that point of time.
You can get the contact details of your nearest Quick Heal dealer here.
To update your contact details, all you have to do is email your current details to support@quickheal.com
No, you can renew Quick Heal only through online renewal.
To update the license details on other devices follow below steps:
Yes. Quick Heal has Total Ransomware Protection. This protection keeps a backup of your data and will help you restore them in case there is any such attack. It is recommended that you always keep Ransomware Protection turned on.
You are advised to always keep Total Ransomware Protection on. This feature regularly keeps a backup of your data including the tally files in an encrypted format. In case of an ransomware attack, you can easily recover all your backed up data.
If you have created vaults and want to uninstall Quick Heal Total Security, it is recommended that you remove your data from the vaults before uninstallation.
If you have already uninstalled Quick Heal, you need to reinstall Quick Heal and then import the vaults. Set the access as per your requirement.
You should configure Internet Browsing Control in Quick Heal Total Security. You can block any website and videos that you think your children should not visit. Thus you can protect them from visiting unwanted content.
You should configure Application Control in Quick Heal Total Security. You can block any application that you want your children should not access.
Quick Heal recommends you to use Webcam Protection to protect your privacy. Some malwares access the webcam of your computer and capture your photos without your consent. Later, the malware attackers can blackmail you.
You can keep Data Theft Protection in Quick Heal Total Security turned on. When you need to share data, you can turn this off temporarily and then turn it on. No unauthorized person can copy data from your computer.
After you install Quick Heal, you must restart your computer. This will resolve the issue.
You can create your own emergency bootable CD that will help you to boot your Windows PC and scan and clean all the drives including NTFS partitions. This CD helps in cleaning stringent viruses/malware from your PC that cannot be cleaned from inside Windows.
You can create an emergency CD or command line scanner from Quick Heal antivirus. This will be created with the latest virus signature pattern file used by Quick Heal antivirus on your system.
To create Quick Heal antivirus Emergency CD, your system should meet the following requirements:
To create an Emergency Disk, follow these steps:
Note: Creating Emergency Disk using CD/DVD is not supported on Microsoft Windows 2003 and earlier versions. However, you can create Emergency Disk on USB drives instead.
If you have not installed any software knowingly and you get a Startup Scanner warning, select "Repair" / "Delete", as this may be a new Trojan/Worm/Backdoor.
However, if you install some software and get a Startup Scanner warning for that software, select "Accept".
You can schedule the scanner to run automatically. You need to schedule the scan once and your PC will be scanned on defined schedule. You can schedule the scan in the following way.
If Quick Heal antivirus detects any virus in a file, document, or tool and you have set the Repair option for action to be taken on virus, the virus will be repaired automatically.
However, if Quick Heal antivirus detects a virus in a compressed file, the Repair option is not enabled because Quick Heal antivirus does not disinfect a virus from a compressed file as per security compliance. To disinfect such files, first uncompress them in a folder, preferably a temporary or isolated folder. Remove the virus using the Quick Heal antivirus scanner. Then you may compress the clean files, if required.
This prompt appears when you switch to a different user profile on Windows XP. Quick Heal antivirus online protection is already enabled and is protecting the 1st user session and the new session. Although the Quick Heal antivirus Online Protection icon for this session will not appear in this profile due to technical restrain, your system is still protected from viruses.
To avoid seeing this message, you can log out from the current session and log in to a different user by using the Logoff option of Windows XP.
All the updates and upgrades are free for registered users until the product license is valid.
New virus threats and malwares are released daily and to combat these threats, new security measures are released as and when required. It is highly recommended that you keep your product updated to ensure security against new threats. You can configure Automatic Update to pick up the updates automatically as and when new updates are available. If set to automatic mode, the updates are taken in the background without user’s intervention.
This issue may arise because of the following reason.
In case, the above issue persists, please contact our technical support team from https://www.quickheal.co.in/support.
You can update Quick Heal whether your computer is connected to Internet if you are in the network.
Note: All your computers will be upgraded automatically. However, 'Update Automatically' is configured by default.
Entertainment Mode is a new feature in Quick Heal Total Security / Quick Heal Internet Security / Quick Heal AntiVirus. When enabled it configures a silent mode across all modules of Quick Heal Total Security / Quick Heal Internet Security / Quick Heal AntiVirus, so that no prompts (virus detection or virus updates) will interrupt you when you are playing a game or watching a movie.
Quick Heal Total Security / Quick Heal Internet Security / Quick Heal AntiVirus) has a new feature "Browsing Protection" that protects you against landing up on websites with malicious content. It ensures that users have a safe browsing experience.
Autorun Protection is a new feature in Quick Heal Total Security / Quick Heal Internet Security / Quick Heal AntiVirus. It secures your PC against autorun malwares by blocking the Autorun feature of the PC. It also safeguards your precious pen drives by vaccinating the pen drive against autorun malware infections.
The Self Protection feature, when activated, ensures that Quick Heal files, folders, configurations and registry entries are not altered or modified by viruses or malwares, or tampered by other applications.
AntiSpam plug-in feature will only work with Eudora and MS Outlook email clients.
You have marked a suspect email ID into Black List using the AntiSpam plug-ins. But to get the word '[SPAM]' in the subject line for the future mails from this ID, you need to check Enable Black List in Option -> Protection -> AntiSpam. This will ensure that all future mails from senders added in Black List, will have the tag '[SPAM]' in the subject line of the mail.
This indicates that the Data Protection feature of Quick Heal Total Security must be enabled. You can disable this feature by un-checking Enable Data Protection in Options -> Protection -> Data Protection.
Please contact Quick Heal Technical Support at support@quickheal.com. Click here to view Quick Heal Technical Support details.
Autorun Protection blocks the execution of Autorun on your PC, or on the pen drives. This avoids autorun malwares from being executed on your system. Data Protection blocks write access to your pen drives, or blocks complete access to your pen drives. This prevents data theft from your system and also assists in avoiding malwares from entering your system via pen drives.
The conventional delete in Windows will retain a copy of the file in Recycle Bin. If you Shift+Delete a file, it is removed from the system. But the file can be retrieved by using a recovery software. The Secure Delete feature in Quick Heal Total Security permanently erases the file from the hard disk making it impossible to retrieve the file using recovery software as well.
To know the list of file extensions supported by the Duplicate File Finder feature, click Tools -> Duplicate File Finder -> Options. The list will be available in the first frame Please select a duplicate category type.
The Defragmenter feature in Quick Heal Total Security defragments vital files, such as page-files and registry hives for improving the performance of the system. Defragmentation reduces the number of fragments, and clubs all the fragments into one contiguous chunk to improve system performance.
The PCTuner tool in Quick Heal Total Security contains a feature called Restore in the Other Menu. Since Auto Cleanup feature is a combination of Disk Cleanup, Registry Cleanup and Traces Cleanup, you will be able to Restore all items deleted by Disk Cleanup and Registry Cleanup, but not the items deleted by Traces Cleanup.
No. Items deleted by Traces Cleanup cannot be restored. All items deleted by Traces Cleanup ensure that user privacy is not breached. Hence, a restore option for Traces Cleanup has not been provided.
If you install Quick Heal on another Mac computer, it is necessary to register your software after you install Quick Heal. You must perform the Registration procedure by providing same Product Key.
One Product Key can be used for multiple computers.
macOS High Sierra 10.13 introduces a new feature that requires user approval before loading newly-installed third-party kernel extensions (KEXTs). When a request is made to load a KEXT that the user has not yet approved, the load request is denied
NOTE: If you do not Allow to load Kernel Extensions, Quick Heal Total Security will not be able to secure your computer against viruses, malicious websites, spam emails, and suspicious programs. Your computer will be at risk.
If you already have Quick Heal Total Security for MAC installed on your Mac System, Total Security will continue to work well after you upgrade to macOS 10.13 High Sierra.
Total Security Multi-Device can be used on multiple devices at the same time, based on your chosen pack (such as 3-device or 5-device). It works across Windows, Mac, and Android using the same product key.
If you reach your device limit, you can still transfer it by deactivating it on one device before activating it on another.
After installation of Quick Heal, you will need to register your copy to activate it. You should Register and Activate your copy immediately after installation, as without Activation Quick Heal cannot be updated. Registered users can get other benefits like technical support, Parental Control, etc.
You can easily register your Quick Heal online with the help of the steps mentioned below:
Note:
If due to any reason you need to reinstall your operating system or Quick Heal, it is necessary to reactivate your copy after reinstallation. You can easily reactivate your Quick Heal online. Click here to know how.
A Serial Number serve as a user’s Identity. In case you lose your Serial Number, you can obtain it by contacting Quick Heal Technical Support at a nominal charge.
You can use a registered copy until the expiry date of its subscription period. After the subscription period is over you will need to renew the subscription to ensure your computer stays protected against new and emerging threats.
• Open your Quick Heal dashboard
• Go to Quick Heal Dashboard > About Quick Heal Total Security > Click View Details
Here, you will find the product key, product version, virus database and subscription validity information.
Registration wizard does not accept invalid product keys. To avoid such messages, please enter a valid product key as provided to you in the registration wizard.
In case the above problem persists even after following the above step, please contact Quick Heal Technical Support.
You need to deactivate Quick Heal license from one of your activated devices. You can deactivate your device from the RDM portal or contact Quick Heal Technical Support for assistance.
You can deactivate your device from the RDM portal or contact Quick Heal Technical Support for assistance.
No, you must deactivate it manually. You can do it from the RDM portal or by contacting Quick Heal Technical Support for assistance.
This is applicable to Quick Heal Total Security Multi-Device. You can activate it using a single product key on your Windows, Mac, or Android device.
No, you can activate Quick Heal only through online registration on the required PC using Internet access.
Once the subscription of your copy of Quick Heal expires, you need to renew it to continue receiving updates against the latest viruses. During renewal, you can renew your copy of Quick Heal for 1 year or 3 years.
Renewing your Quick Heal ensures that your computer keeps receiving continuous security updates that are necessary to prevent malware attacks and online threats. Renewing is also cost-effective because it is cheaper than purchasing a new product.
If you renew your copy of Quick Heal before subscription expiry, you will receive a bonus of two months' additional protection during renewal of subscription.
If you have purchased the box copy of Quick Heal, the Product Key (or Serial Number) will be pasted on the User Guide or inside the box. If you have purchased the software online, you will find the Product Key in the email confirming the order.
If you purchase a renewal code with validity for 1 Year or 3 Years and renew your copy of Quick Heal before subscription expiry, you will get subscription validity of 1 Year + 2 Months or 3 Years + 2 Months from the date of subscription expiry. If you renew your copy of Quick Heal after subscription expiry, then you will get 1 Year or 3 Year validity from the date of renewal.
Example 1
Mr. John has a copy of Quick Heal Total Security for Mac that expires on April 10, 2013. He purchases a renewal code on March 10, 2013 and renews his copy. His new subscription validity is June 10, 2014 (1 Year + 2 Months).
Example 2
Mr. Jack has a copy of Quick Heal Total Security for Mac that expires on April 10, 2013. He purchases a renewal code on May 10, 2013 and renews his copy. His new subscription validity is May 10, 2014 (1 Year).
No, a CD is not provided for renewal. The purchased renewal code will extend the subscription of your copy of Quick Heal. If you want to upgrade to the latest Quick Heal product during your subscription validity, you can do it free of cost by downloading the Product Upgrade from the Upgrade page.
As per Quick Heal Renewal Policy, if your copy of Quick Heal has expired then you can renew it within six months from the date of expiry.
If you need to uninstall your copy of Quick Heal from your machine and re-install it later, you must reactivate the software upon installation. This is called Reactivation. Extending the subscription validity of your copy of Quick Heal by purchasing a renewal code is called Renewal.
During renewal of your copy of Quick Heal, if you purchase an additional copy of Quick Heal, you will receive a discount on the purchase of the additional copy. To know more, contact your nearest Quick Heal branch or distributor for the same. For a list of Quick Heal branches and distributors across the globe, please visit our Locate Dealer page.
You can contact Quick Heal Support Center. You can also contact your nearest Quick Heal branch or distributor. For a list of Quick Heal branches and distributors across the globe, please visit our Locate Dealer page.
After purchasing the renewal code, please follow the steps mentioned below (ensure that your system is connected to the Internet during the entire procedure):
OR
Renewing an expired product license means that its validity will last from the renewal date till its new expiry date*. For instance, your product license (1 year) expired on 1st January 2015. You renew it for 1 year on 20th January 2015. So, the new expiry date of your license key will be 20th January 2016.
*Terms & Conditions will apply as per offer(s) running at that point of time.
No, you can renew Quick Heal only through online renewal.
You can schedule the scanner to run automatically at predetermined time and intervals. You can schedule the scanning for daily and weekly. This will supplement other automatic protection features to ensure that your machine remains virus-free.
To configure Schedule Scans, follow these steps:
To configure Proxy Setting, follow these steps:
Quick Heal Total Security for Mac, Total Security, Internet Security and AntiVirus Pro has a feature called Browsing Protection. It runs Internet browsers in a virtual environment. Any malicious file downloaded in this environment is isolated from the real PC thus preventing such files from causing a malware infection.
Please contact Quick Heal Technical Support at support@quickheal.com. Click here to view Quick Heal Technical Support details.
Browsing Protection automatically blocks access to websites that are loaded with malware codes and are designed to infected visitors’ machines.
Phishing Protection is a part of Web Security that blocks access to fake and phishing websites designed to steal personal and financial information from users.
With Password Protection, you can restrict all other users from accessing Quick Heal Total Security so that no unauthorized users can make any changes in the settings.
To configure Password Protection, follow these steps:
Parental Control can be used to control the Internet activity of the children or other users. Parents can decide which websites their children should visit and which they should not. Using the Parental Control feature, the parents can restrict categories of websites or block specific websites. The parents can also schedule Internet accessibility for their children.
With Spam Protection, you can block all unwanted emails such as spam, phishing and porn emails, from reaching into your mailbox. Spam Protection is enabled by default and we recommend you always keep the feature enabled.
Open Quick Heal Total Security and then go to Menu > Quick Heal Total Security > About Quick Heal Total Security. On the About screen, click the View Details button.
To get support regarding any technical issues, follow these steps. On the Quick Heal Total Security menu bar, go to Help > Support. Here you can find various means for support.
To access the Help option, follow these steps.
On the Quick Heal Total Security menu bar, go to Help > Quick Heal Total Security Help.
Scan My Mac is a complete scanning of your system. With Scan My Mac, you can scan the entire machine, files and folders excluding mapped network drives, folders, and files.
No, you need to follow these steps on rest of the devices:
Note: Please follow the same procedure on all the respective devices.
To download and install Quick Heal Mobile Security, follow these steps:
To register Quick Heal Mobile Security, follow these steps:
To secure your Quick Heal app from being removed by any unauthorized user, go to Quick Heal app menu > Settings > General > Block Uninstallation. Turn it on. It is recommended that you always keep this option enabled. If your device is lost or stolen, no one can remove the app from your device. Further, this will also help you lock, track your device and wipe its data too.
To remove the malicious app from the device, run Quick Scan or Deep Scan on your mobile device. You can also schedule a virus scan at a time that is convenient for you. Quick Heal Mobile Security scans apps installed on your device for all possible virus infections. If any threat is found, take an appropriate action such as Skip or Uninstall the app.
Uninstalling Quick Heal Mobile Security exposes your mobile and your valuable data to virus threats, loss and theft. However, if you wish to remove it from your device, follow these steps:
You can find the license details in the About screen of your Quick Heal Mobile Security. To get the license details, follow these steps:
You need to re-activate your product if you have uninstalled it from your device in the past, and now installing it back again.
Re-activation of Quick Heal Mobile Security using the same product key is possible only with the same mobile number on any mobile device.
To buy premium features through Google Play store, go to Google Play store, search for Quick Heal Total Security (Premium), and follow the instructions to purchase premium features.
Quick Scan quickly scans all the apps installed on your device for any threat.
To run Quick scan on your device, follow these steps:
A security vulnerability (also known as a security hole) is a security flaw detected in an app or software that may leave it open to hackers and malware.
Yes. The security and privacy score give you an idea of the safety status of your device and your data. Check Security and Privacy score to view and follow the recommendations to increase the score and make your device safe.
Yes, Privacy Advisor feature helps you detect such apps. It helps you modify the list of permissions given to all the apps in your device, and you can uninstall any such app which feels unsafe to you. For more details, see Privacy Advisor.
It scans the apps on Google play store for any threat before it is downloaded on your device. It informs you if the app is insecure and there are any risks behind installing the app.
Yes, Play Store App Advisor needs access permissions to run a scan before downloading the app on the devices with OS 6.0 and later versions.
A deep scan runs a complete scan of your device (all apps, memory, files) and memory card for any threats.
To run Deep scan on your device, follow these steps:
Connecting to unsecured networks may put your private data like passwords, bank accounts, emails, etc., at risk of being stolen or spied upon.
The Wi-Fi Security runs a scan of the Wi-Fi your device connects to. It notifies you if you are connected to is safe to use.
No. Running more than one antivirus software on a single computer is not recommended.
The Registration Wizard of Quick Heal AV for Alliance will appear at every boot until you register you license. On the Registration Wizard, click Next and register your product.
To launch Registration Wizard manually, follow either of these steps.
Click on any feature, you will be prompted to enter your password. On the same dialog box, you can see a link Forgot password? Using this link, you can retrieve your password.
You may also contact our Technical Support Team.
In case, you have lost your Product Key, you can obtain it by contacting our Technical Support. You may need to pay a nominal fee to get the Product Key.
Please write to us at info@quickheal.com with your registered email address and name. Alternatively, you can also visit www.quickheal.co.in/lost.
To update your contact details, send us an email with your current details to info@quickheal.com.
Please contact Quick Heal Technical Support.
Removing Quick Heal AV for Alliance may pose your computer to virus threats. However, if you need to uninstall Quick Heal AV for Alliance, follow these steps:
Note: Uninstalling Quick Heal AV for Alliance requires administrative rights.
To install Quick Heal AV for Alliance, double-click the product setup and then follow the on-screen instructions. It is important that you register the product soon after you install it. A subscriber with registered license can use all the features without any interruptions, take the updates regularly, and get technical support whenever required.
Quick Heal AV for Alliance can be installed on any of the following Windows operating systems — Windows 10, Windows 8.1 / Windows 8, Windows 7, Windows Vista, Windows XP (SP 2), or Windows 2000 (SP 4).
You can register/activate Quick Heal AV for Alliance online, offline, and through SMS as per your convenience.
If you are connected to the Internet, you can register Quick Heal AV for Alliance online in the following way:
If you have already installed Quick Heal AV for Alliance, an icon will appear in the system tray. To open this product, double-click the Quick Heal AV for Alliance icon.
Or
If your operating system is Windows 10, click the Windows icon. On the Apps list, select Quick Heal AV for Alliance.
On other operating systems, select Start > Programs > Quick Heal AV for Alliance > Activate Quick Heal AV for Alliance.
You can register Quick Heal AV for Alliance offline if your computer is not connected to the Internet. Before registering Quick Heal AV for Alliance offline, you must have product key, installation number, and a license key.
Find your Product Key
To get the product key, please contact your vendor from where you received the product.
Find your Installation Number
You can find the Installation Number from the Activation Wizard in the following way:
If you have already installed Quick Heal AV for Alliance, an icon will appear in the system tray. To open this product, double-click the Quick Heal AV for Alliance icon.
Or
If your operating system is Windows 10, click the Windows icon. On the Apps list, select Quick Heal AV for Alliance.
On other operating systems, select Start > Programs > Quick Heal AV for Alliance > Activate Quick Heal AV for Alliance.
The offline activation screen appears with the offline activation URL and Installation Number. You can note down the URL for offline activation and 12-digit Installation Number or click Save to file to save the details in text file.
Generating activation license key
To generate an activation license key, follow these steps:
A new key is generated. Save this key for future reference. This key is also sent to your email address that you provided during registration of the product.
Activating Quick Heal AV for Alliance with activation license key
After the offline activation key is generated, you can proceed with activating Quick Heal AV for Alliance on your computer.
If you have already installed Quick Heal AV for Alliance, an icon will appear in the system tray. To open this product, double-click the Quick Heal AV for Alliance icon.
OR
If your operating system is Windows 10, click the Windows icon. On the Apps list, select Quick Heal AV for Alliance.
On other operating systems, select Start > Programs > Quick Heal AV for Alliance > Activate Quick Heal AV for Alliance.
You can register Quick Heal AV for Alliance through SMS also.
Note: Currently, the facility to register through SMS is available to the subscribers based in India only.
To register Quick Heal AV for Alliance through SMS, follow these steps:
If you have already installed Quick Heal AV for Alliance, an icon will appear in the system tray. To open this product, double-click the Quick Heal AV for Alliance icon.
Or
If your operating system is Windows 10, click the Windows icon. On the Apps list, select Quick Heal AV for Alliance.
On other operating systems, select Start > Programs > Quick Heal AV for Alliance > Activate Quick Heal AV for Alliance.
Yes. For this, you must first uninstall the antivirus software from the current PC and then you can install it on another PC. Moreover, you need to register your software once again on the new PC. To register Quick Heal AV for Alliance, see How can I register/activate Quick Heal AV for Alliance? on this FAQ page.
You can find the Product Key in the following way.
You will find the Installation Number from the Activation Wizard while registering offline. See Find your Installation Number under Registering offline.
This prompt general appears when you try to re-register/reactivate with previously generated License.key. If you are reactivating the product on the same PC or another PC, you need to generate a new License.key. To know how to generate activation key, see Generating activation license key.
Different operating systems may be available in different versions, 32-bit or 64-bit. It is important that you download the right build of Quick Heal AV for Alliance in compliance with the operating system of your PC. To check the operating system and version of your computer, follow these steps.
On Windows 10
On Windows 8.1 and Windows 8
On Windows Server 2012 R2, Windows Server 2012, and Windows Server 2008 R2
Microsoft Windows Server 2012 R2, Windows Server 2012, and Windows Server 2008 R2 operating systems are available only in 64-bit.
On Windows 7, Windows Vista, and Windows Server 2008
On Windows XP and Windows 2003 Server operating systems
On Windows 2000 and earlier operating systems
Microsoft Windows 2000 including all its flavors and operating systems prior to Windows 2000 are available only in 32-bit architecture.
You can create your own emergency bootable CD that will help you to boot your Windows PC and scan and clean all the drives including NTFS partitions. This CD helps in cleaning stringent viruses/malware from your PC that cannot be cleaned from inside Windows.
You can create an emergency CD or command line scanner from Quick Heal AV for Alliance. This will be created with the latest virus signature pattern file used by Quick Heal AV for Alliance on your system.
Operating system compatibility for Emergency CD
To create Quick Heal AV for Alliance Emergency CD, your system should meet the following requirements:
Before creating an Emergency Disk, ensure the following
Creating Emergency Disk
To create an Emergency Disk, follow these steps:
Note: Creating Emergency Disk using CD/DVD is not supported on Microsoft Windows 2003 and earlier versions. However, you can create Emergency Disk on USB drives instead.
Using Emergency Disk
If you install some software and you get a Startup Scanner warning for that software, select "Accept". If you have not installed any software knowingly and you get a Startup Scanner warning, select "Repair" / "Delete", as this may be a new Trojan/Worm/Backdoor.
You can schedule the scanner to run automatically. You need to schedule the scan once and your PC will be scanned on defined schedule. You can schedule the scan in the following way.
If Quick Heal AV for Alliance detects any virus in a file, document, or tool and you have set the Repair option for action to be taken on virus, the virus will be repaired automatically.
However, if Quick Heal AV for Alliance detects a virus in a compressed file, the Repair option is not enabled because Quick Heal AV for Alliance does not disinfect a virus from a compressed file as per security compliance. To disinfect such files, first uncompress them in a folder, preferably a temporary or isolated folder. Remove the virus using the Quick Heal AV for Alliance Scanner. Then you may compress the clean files, if required.
This prompt appears when you switch to a different user profile on Windows XP. Quick Heal AV for Alliance Online protection is already enabled and is protecting the 1st user session as well as the new session. Although the Quick Heal AV for Alliance Online Protection icon for this session will not appear in this profile due to technical restrain, your system is still protected from viruses.
To avoid seeing this message, you can log out from the current session and log in to a different user by using the Logoff option of Windows XP.
New virus threats and malware are released daily and to combat these threats we release new security measures as and when required. It is highly recommended that you keep your product updated to ensure security against latest threats. You can configure Automatic Update to pick up the updates automatically as and when new updates are available. If set to automatic mode, the updates are taken in the background without user’s intervention.
This issue may arise because of the following reason.
In case, the above issue persists, please contact our Technical Support Team.
You can renew Quick Heal through the application.
To renew, you need either renew your existing product key or can to get a new renewal Product Key as well
For more details reach out to renew@quickheal.co.in or call us at 09272202525
If you renew your license online, the license details will get updated automatically.
To update your license details manually:
Your details will be updated.
If you are using an older version of Quick Heal antivirus, we recommend that you first upgrade it to the latest version and then renew your license.
To upgrade to the latest version,
Download and install the latest product build from Quick Heal Installer.
1800-121-7377.You can drop us an email at renew@quickheal.co.in, with your banking transaction details. Quick Heal will get back to you with an update. Contact our renewal helpline on +91-92722 02525. Available Timings: Monday to Friday - 09.00 AM to 07.00 PM (IST), Saturday & Sunday - 09.30 AM to 06.30 PM (IST).
After we confirm the payment, your license is renewed within 30-60 mins.
With Quick Heal’s metaProtect portal, you can manage and monitor the security of all your devices remotely. Here's what you can do:
Not really, metaProtect needs your device to be online for remote control and syncing to work.
If Quick Heal finds that your personal information like your email or phone number has been exposed on the dark web, you’ll be informed through the Quick Heal console. We’ll also guide you on the steps you can take to stay safe from fraud or identity theft.
You can monitor up to 5 email addresses and 2 phone numbers with Dark Web Monitoring.
A data leak happens when your personal information gets out, either because of a hack, a security gap, or it's accessed without permission.
We scan the dark web for leaks of:

HAVE AN IDEA FOR US TO IMPROVE?
SHARE YOUR IDEA
WANT TO BE A PART OF OUR GROWTH?
Partner (Retail/Affiliate) with Us
Please complete your information below to login.